Combat
Now that you know the basics covered in the Quick Crash Course, let's get on with the good stuff.
Tip: You can get into a fighter and try some of the things mentioned here, in training mission 6.
Mechanics
Range
Look at your inventory screen (toggled with F4). The range of each gun and missile will be listed there.
If you are in range of your target, a reticule will show for your guns and the missiles will start to lock on.
Tip: Fired missiles inherit the ships speed, increasing their actual range. However you will not get a lock before in range, meaning the missiles home only half as good. So this is useful against relatively stationary targets, or enemies moving straight towards you.
Aiming
This is possibly the hardest part for new pilots, due to the unusual handling of the "virtual joystick". Also space is vast and projectiles have a travel time, requiring you to "lead" the target, if it is moving. Finally, some projectiles inherit your own speed, complicating the "lead" situation.
Thankfully your spaceship provides an easy way to tell if you are aiming in the right direction: The reticle will turn from red to green:
This will allow you to land quite a few shots, however it doesn't allow you to tell in which direction to correct your aim and still isn't accurate enough. What you want to do is, watch your fired projectiles fly towards the target and correct your aim to make sure they hit.
Tip: If you are near a carrier or manning a turret in a bomber, those ships will provide you with a lead indicator. In that case, shoot right at it and your shots will hit, unless the enemy manages to dodge in the time it takes your projectiles to travel.
Missiles
When launching missiles, they are accelerated in the direction you are aiming and inherit your ship's speed. They turn, trying to fly directly at the target.
This means you ideally aim behind them, so the missiles end up chasing them. If you lead the missiles, like with the guns, they will fly at the target from the side and are less likely to hit.
Dropping Countermeasures
You hear a warning tone, when a missile is homing in on you. Generally, this is when you want to drop countermeasures with Z. They have a certain chance to spoof the incoming missile.
Evasive Maneuvers
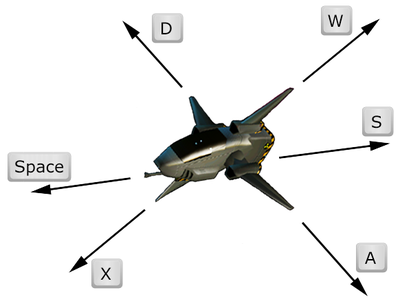
Other pilots have the same issues trying to hit you. Make it harder for them by using your sidethrust keys as soon as they start landing shots.
If you have a longer range them them. (Typically if they are in an Interceptor) use your back thrust key S to stay out of their range longer, while firing at them. Once they closed, you can try to fly towards them instead and pass them right by, going out of their range again.
Tip: Roll your ship with Q and E.
Intercept Course
Fly to where your target will be instead of where it is right now. So if a miner flies towards an asteroid to mine, fly to it as well. Most of the time, you want to intercept a target in mid-space, so it takes some guess work.
Boosters
Fighters and Interceptors are equipped with boosters. They allow you to reach much higher speeds, while your fuel lasts. Activate them with Shift-Space.
They will also shake your ship up, making it very hard to aim. It can still be done, if you are very close already, or firing at a big target, like a carrier.
Visibility
Below the speed in your HUD, it shows your current signature rating. It determines, how far away enemy sensors will pick you up. When you fire a gun, or use the boosters, it increases for the duration.
When you see the eye symbol: ![]() next to your Energy gauge, it means the enemy has spotted you. Conversely it means, they can't see you, while it isn't showing. You can use this to sneak up on them.
next to your Energy gauge, it means the enemy has spotted you. Conversely it means, they can't see you, while it isn't showing. You can use this to sneak up on them.
Note Sensors are directional. They are stronger in the forward direction.
Tip: Asteroids block sensors. So you can hide behind one, or approach with an asteroid between you and your target.

Kill Bonus
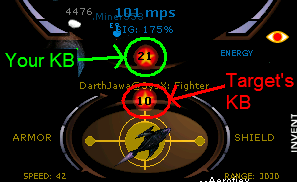
The Kill Bonus is a reward for destroying enemy ships. It increases your damage against everything, by the KB in %. You start with 10 KB and the maximum is around 40 KB.
If the escape pod is destroyed, the KB will be set to 0. This makes the KB a good reason to try and save your and your team's pods.
Tip: If you see an enemy with a high Kill Bonus, best engage him together with a team mate.
Sticking Together
Use numbers to your advantage. If you have a team-mate with you, engage the enemy together.
A good way to do this, is to use the Command View F3. Keep the same distance from the enemy as your team-mates. Only close the Command View, once you are almost in weapon range.
Tip: You can use the booster and all the other movement keys, while in the Command View.
Ship Types
Scouts 
Scouts have great sensors. So having at least one in a group is a good idea to actually see the enemy.
They also can do some damage on their own. Equipped with enough dumbfire missiles, they have a chance to take out an enemy miner or constructor.
Another strength of the scout is its ability to carry a nan. When in a team fight, hang back, hiding behind your team-mates and once their shield is down, get in there and send them some nanites to keep their armor up. This requires good aim, just like firing a normal gun.
Finally, they can carry Proximity Mines. A potentially devastating weapon. The trick is to get your enemy to fly through them at high speeds. It takes about five seconds to activate after dropping.
- If you see someone boosting towards you, try to backpedal with S and drop prox in their path.
- The better version of the above is to use the Command View F3 to drop prox and lure them into it. This is quite hard to get right though.
- Drop it in front of an aleph enemies are likely to come through.
Fighters 
The fighter has two or three of the guns used by the scout.
It can use missiles. When you go against enemy miners, constructors, or bombers the dumbfire missiles will be best. Against more agile targets, use the Seeker or Quickfire missiles.
In the later game, the commander can unlock the Galvonic Blaster for fighters. It can damage enemy outposts and teleport receivers.
Interceptors 
The interceptor has powerful, but short range weapons. It relies on its boosters to get close and personal with the enemy.
It is not able to teleport/ripcord, so it usually isn't seen far from its base.
Tip: When you do intend to fly to another sector, you may want to take even more than the three extra fuel canisters which are default.
Note The interceptor doesn't have shields, missiles, or deployables. It relies solely on its speed and close-range firepower. As such, it is vulnerable to prox.
Stealth Fighters 
The stealth fighter has weak armor, but it can use a cloak with G to become near invisible.
Note The cloak works by lowering your signature. If a ship gets too close, it can still find you.
Tip: To be extra stealthy, dismount your missiles Ctrl-5 while you don't use them and don't even take a shield with you. Both increase your signature while equipped.
The main weapons of the stealth fighter are the LRM Hunter missiles. They have a long range and good turn rate, allowing the stealth fighter to stay undetected, while raining death on the enemy.
To do more damage, they can also use energy weapons:
Note Both the energy weapons and cloak use energy. Recover your energy at range before attacking.
The stealth fighter has decent sensors, enabling it to find and destroy enemy miners quite effectively on its own.
Faction Quirks
The factions make a real difference to the gameplay. Be prepared to be surprised. Some of the things you might encounter:
- Belter fighters and interceptors can carry a nan and repair each other.
- Rixian Unity scouts can be teleported to. (It depletes their energy.)
- Also Rixian Unity ships turn fast on the horizontal axis, but barely at all on the vertical. (Use roll keys Q and E.)
- Technoflux scouts can mount two guns, making them quite powerful early on.
See Also
Cadet PRS lessons for the ship types:


